
Install eSIM on Google Pixel
Settings, Network & internet, SIMs, then scan your BrisqNet QR code.
A step-by-step walkthrough for Google Pixel phones, from the installation email through scanning your QR code to turning on data roaming.
Step 1 of 12
Open your installation email
When your plan is ready, BrisqNet emails you a secure installation link. Open that email and tap Install eSIM now. You will need a Wi-Fi or mobile connection throughout - your phone downloads the eSIM over the internet.
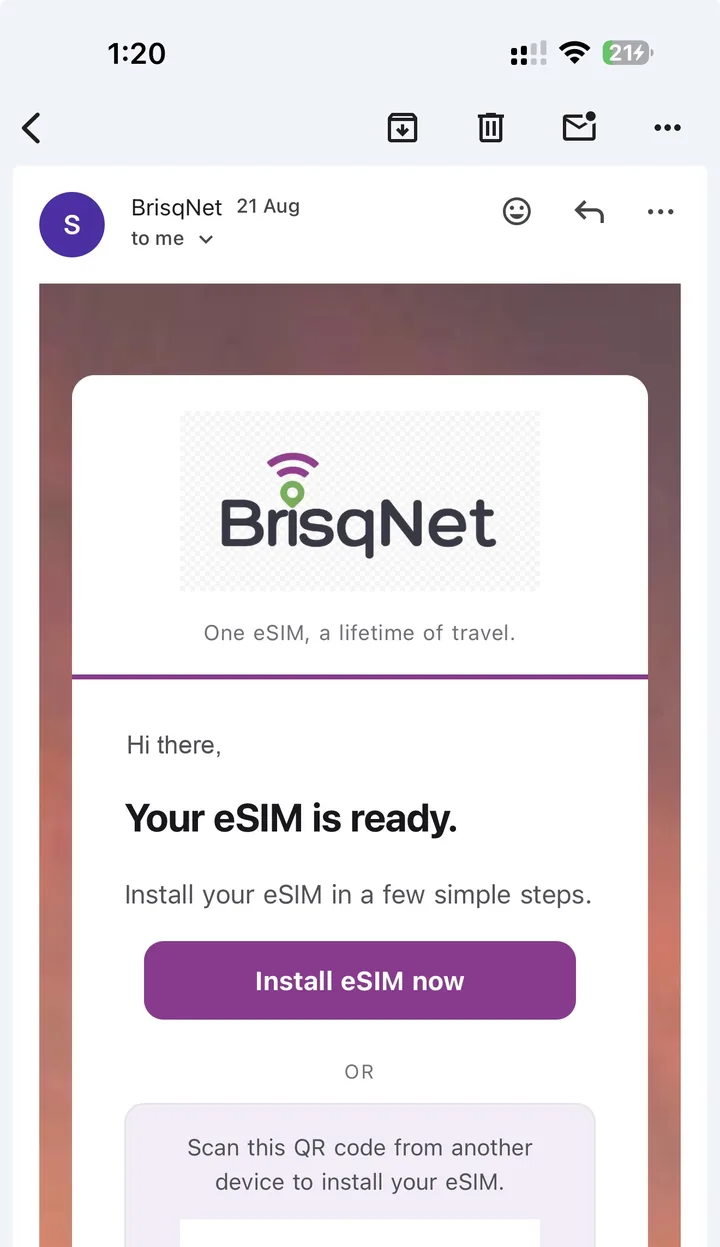
Your installation email contains the secure link. Step 2 of 12
Find your QR code
The link opens your secure BrisqNet installation page, which shows a QR code. On Android you install by scanning that code. A phone usually cannot scan a QR shown on its own screen. Either open the page on a second device - a laptop, tablet or another phone - and scan it from there, or save the QR to your gallery first: both the Samsung and Pixel scanners have a button for choosing an image instead of using the camera. Never forward the email or share the QR code. Anyone who has it can install your plan.
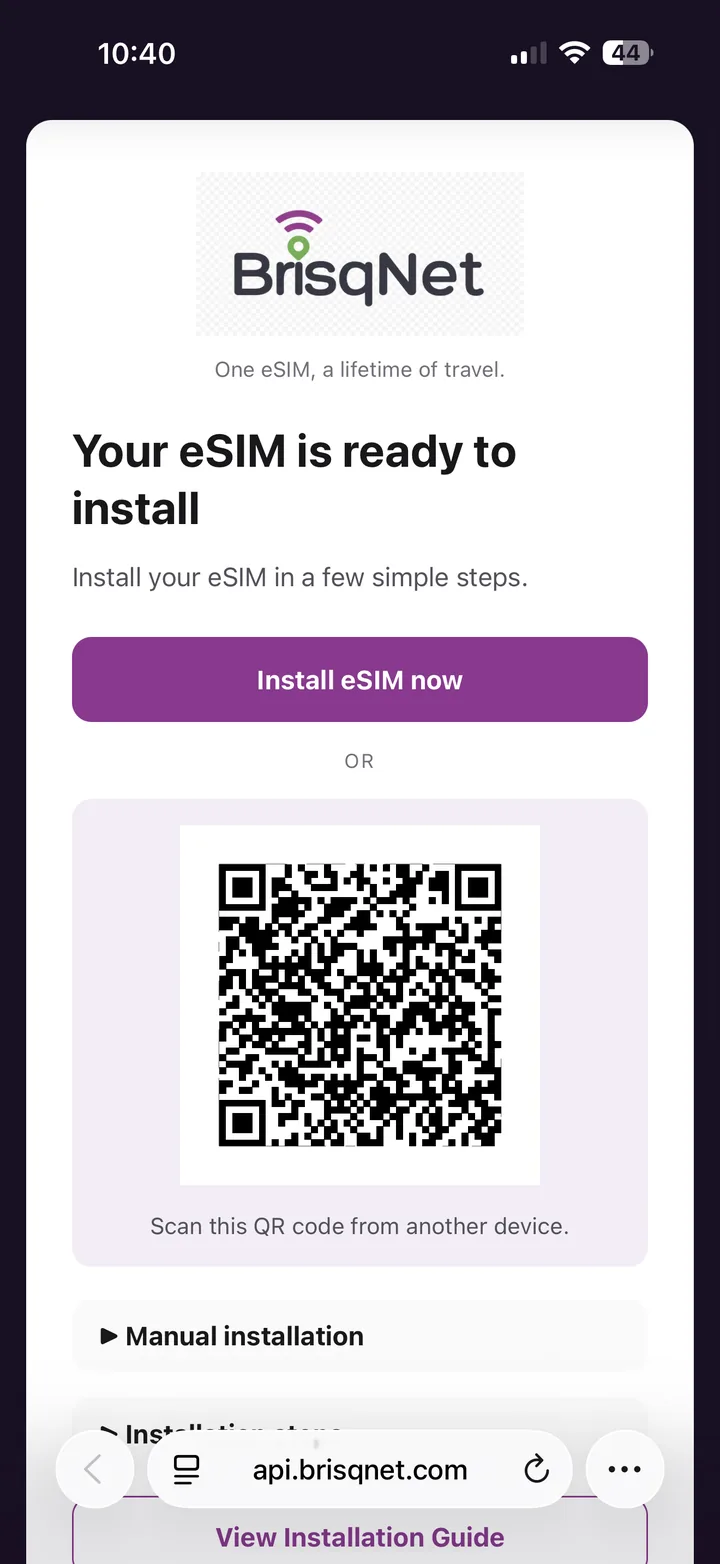
Open this page on a second screen, or save the QR to your gallery. Step 3 of 12
Open Settings and tap Network & internet
On most recent Google Pixel phones, open Settings and tap Network & internet. Menu names can vary a little between Android versions.
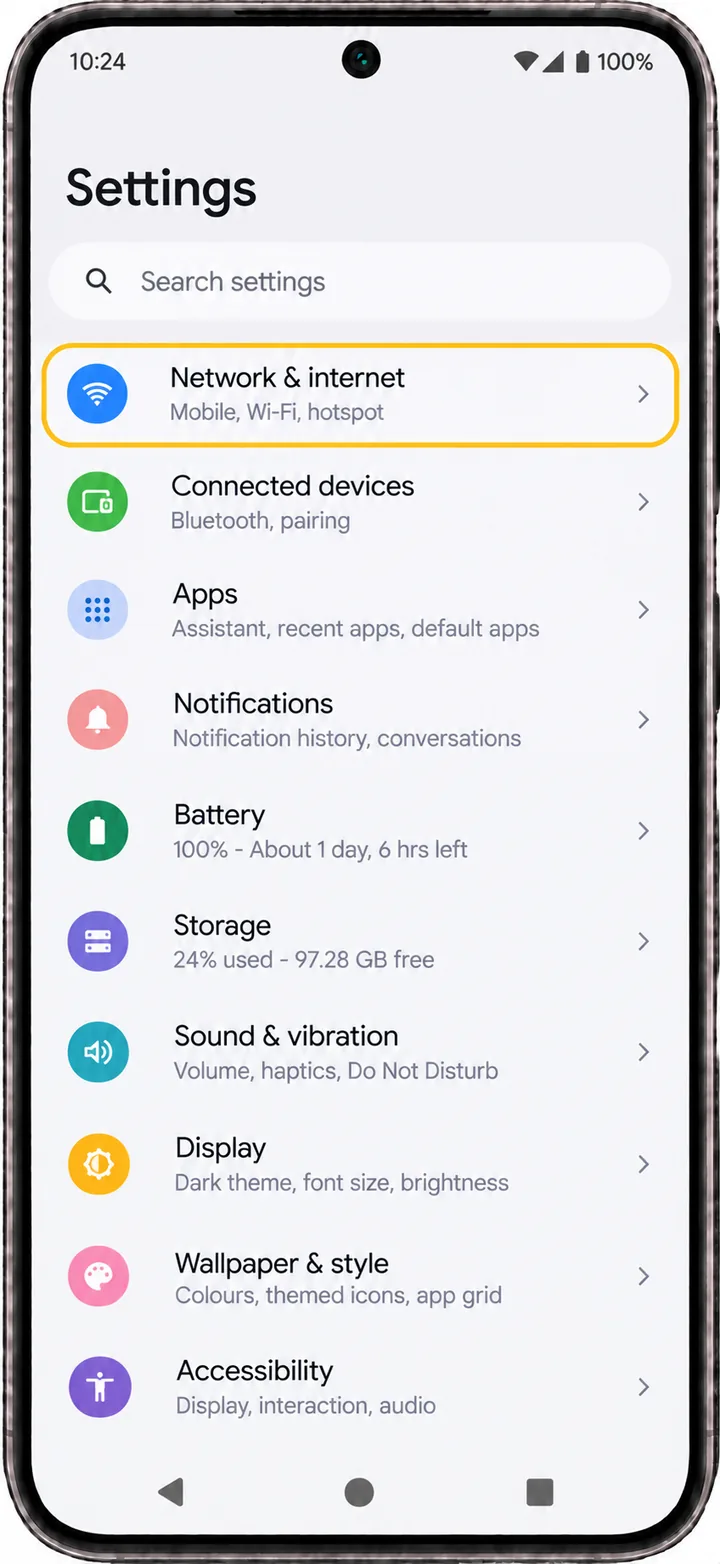
Settings, then Network & internet. Step 4 of 12
Tap SIMs
In Network & internet, tap SIMs. This is where your phone lists the SIMs and eSIMs it already has.
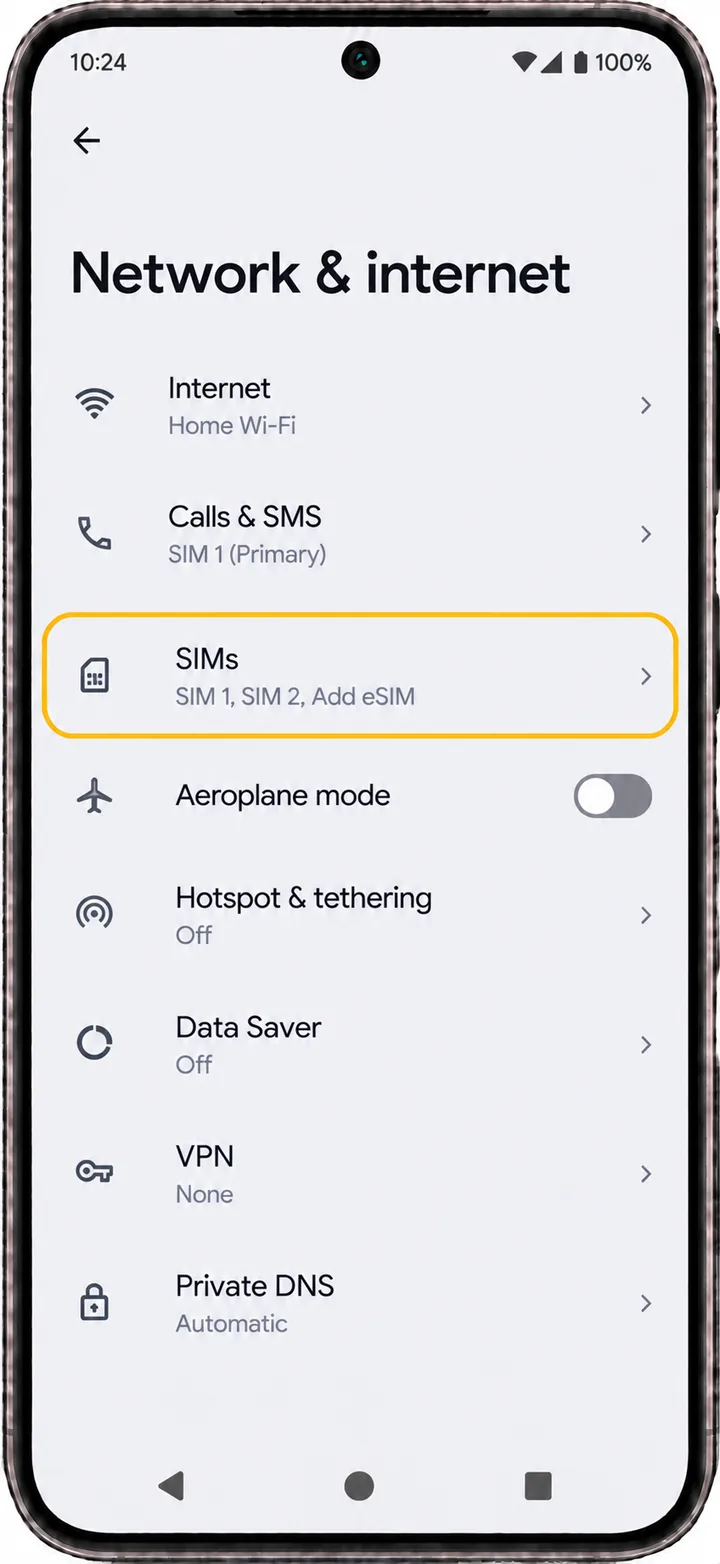
Network & internet, then SIMs. Step 5 of 12
Tap Add eSIM
Tap Add eSIM. Your existing SIMs stay exactly as they are - you are adding a line, not replacing one.
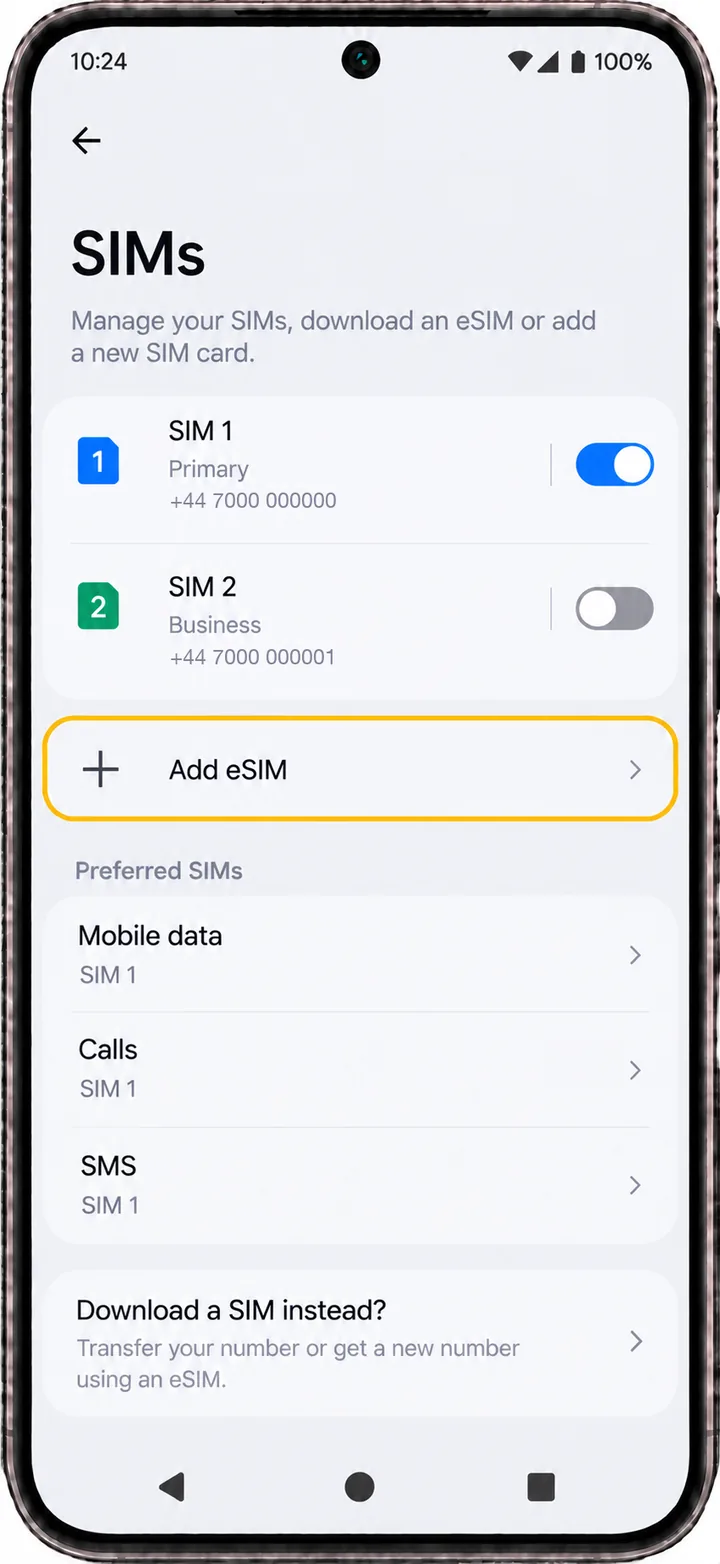
Add eSIM sits below your current SIMs. Step 6 of 12
Choose Scan a QR code
Pixel offers a few ways to set up an eSIM. Choose Scan a QR code - that is the option BrisqNet uses.
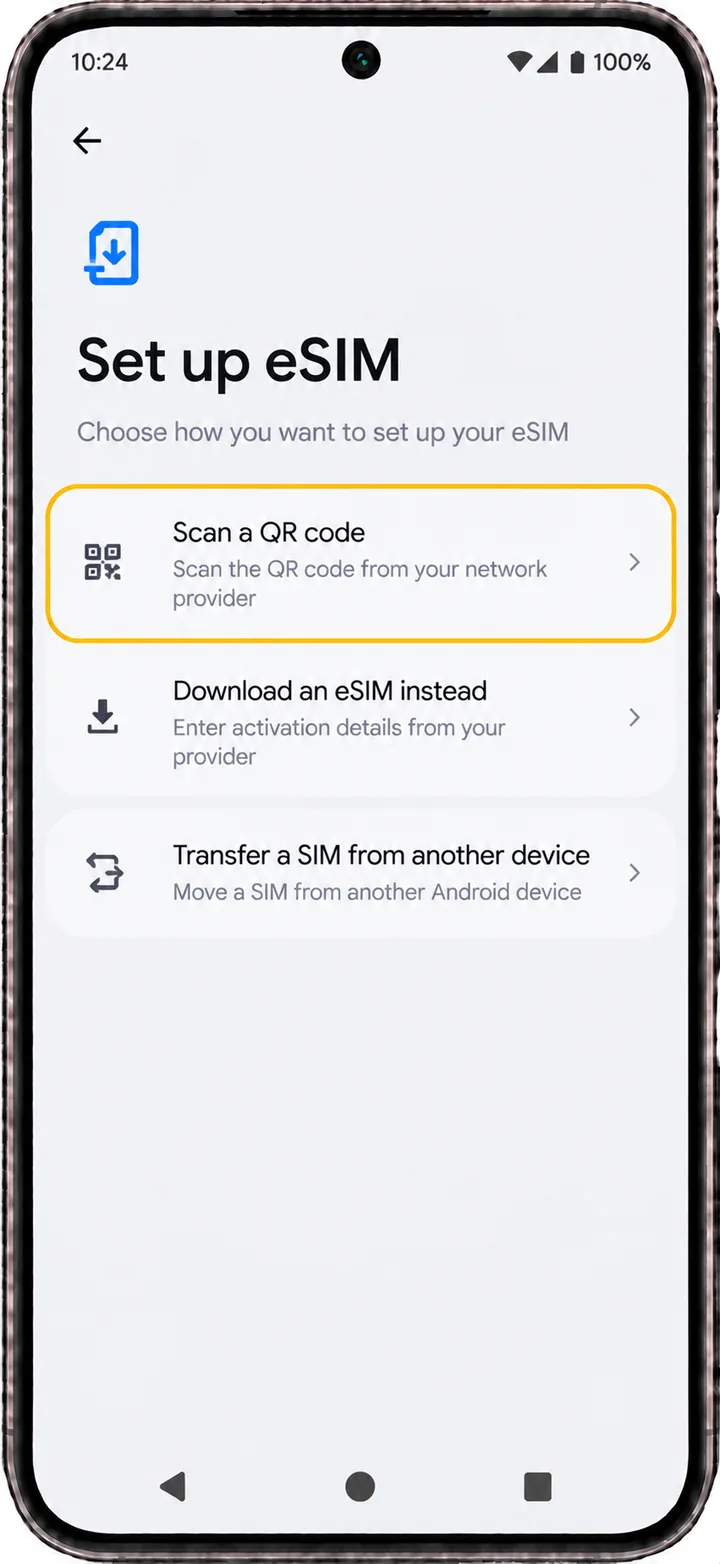
BrisqNet installs by QR code. Step 7 of 12
Scan your BrisqNet QR code
Point the camera at the QR code on your BrisqNet installation page. If the page is open on this same phone, use the option underneath the viewfinder - it lets you set up without pointing the camera at another screen.
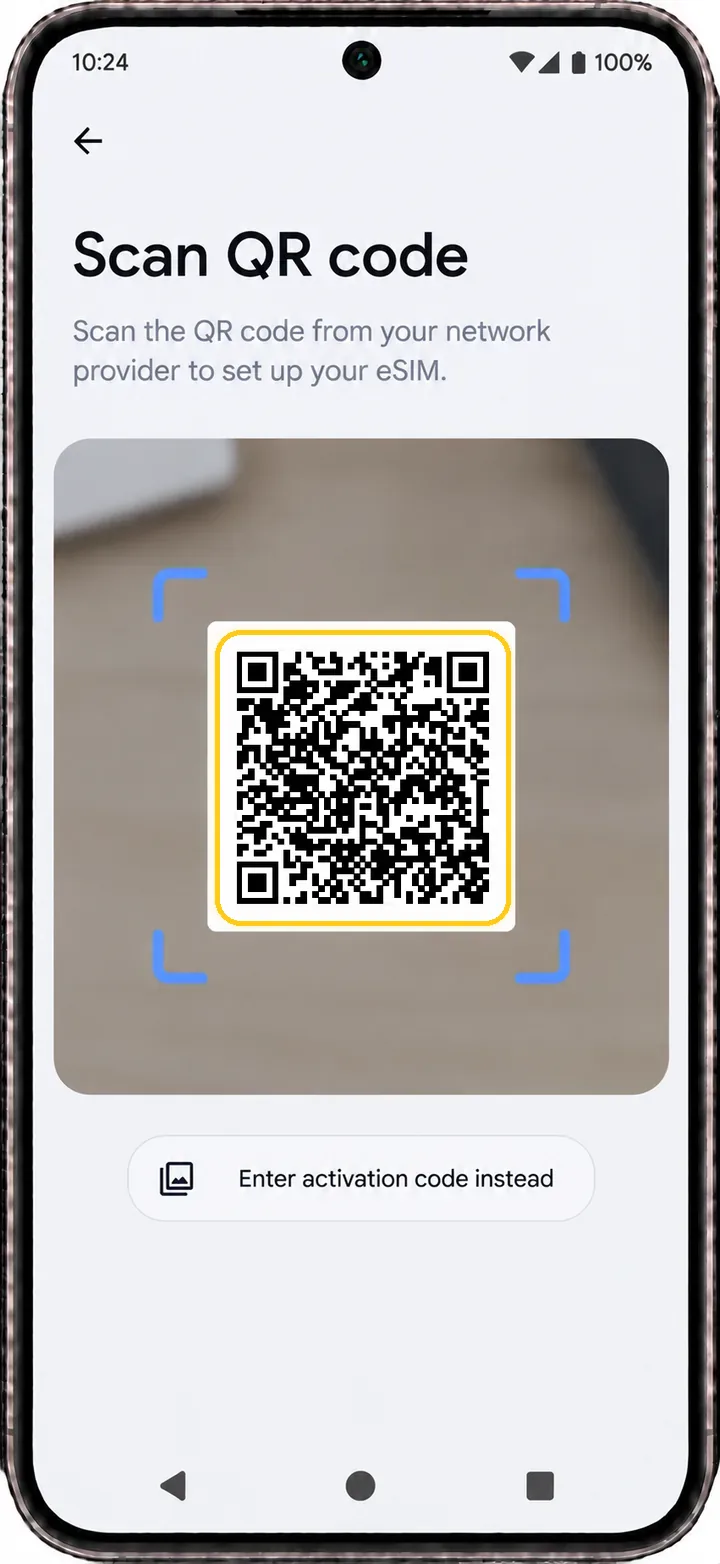
Scan from a second screen where you can. Step 8 of 12
eSIM installed
Your Pixel confirms the eSIM is installed and ready to use, then shows its label. The name comes from our network partner, so it usually reads Travel - Connect, Connect, Travel or something similar. You can change the label later in Settings if you would rather call it BrisqNet eSIM - that is optional. Tap Done.
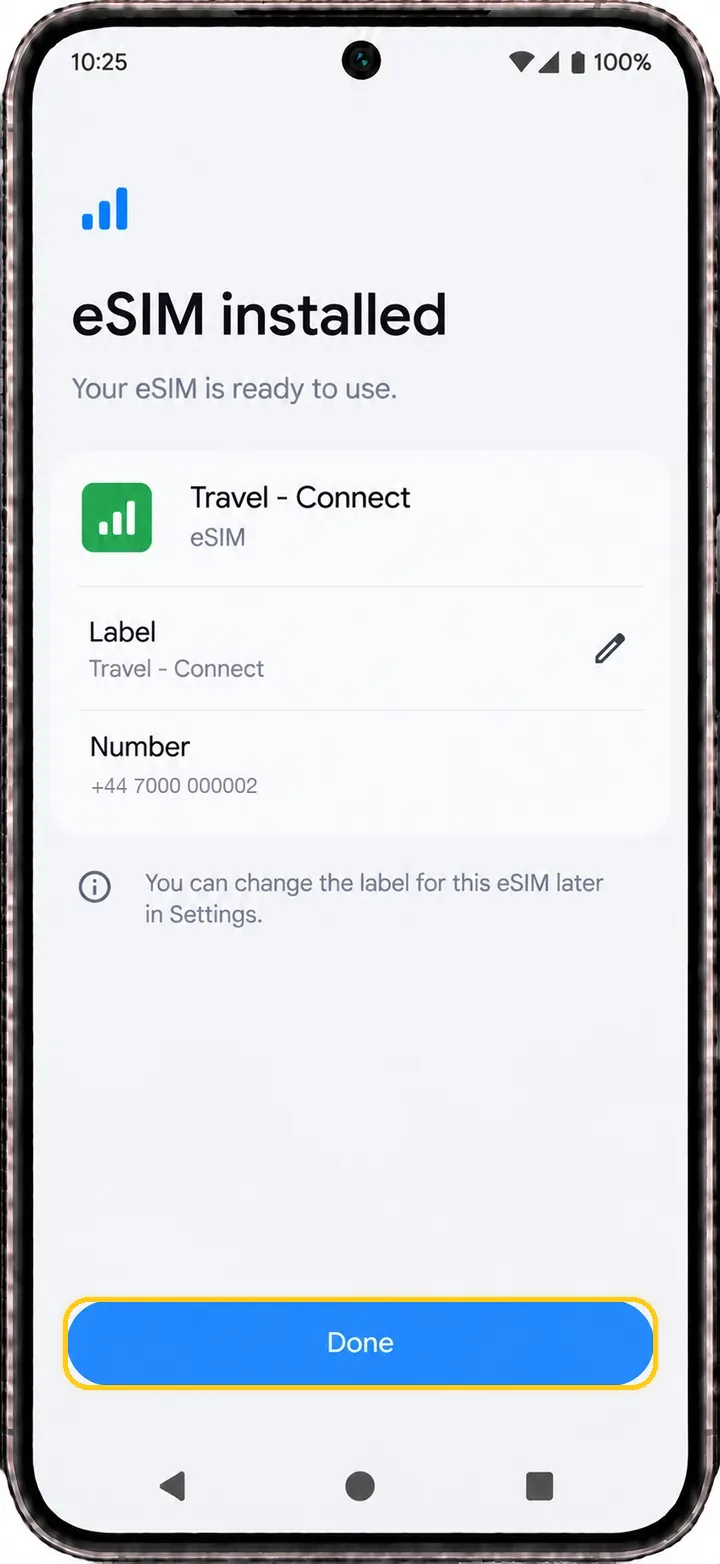
Installed. Two settings left before you travel. Step 9 of 12
Check your travel line, then tap Mobile data
Back in SIMs, your travel line now appears alongside the SIMs you already had, switched on. Under Preferred SIMs, tap Mobile data and choose the travel line. Calls and SMS can stay on your usual SIM - there is no need to remove it.
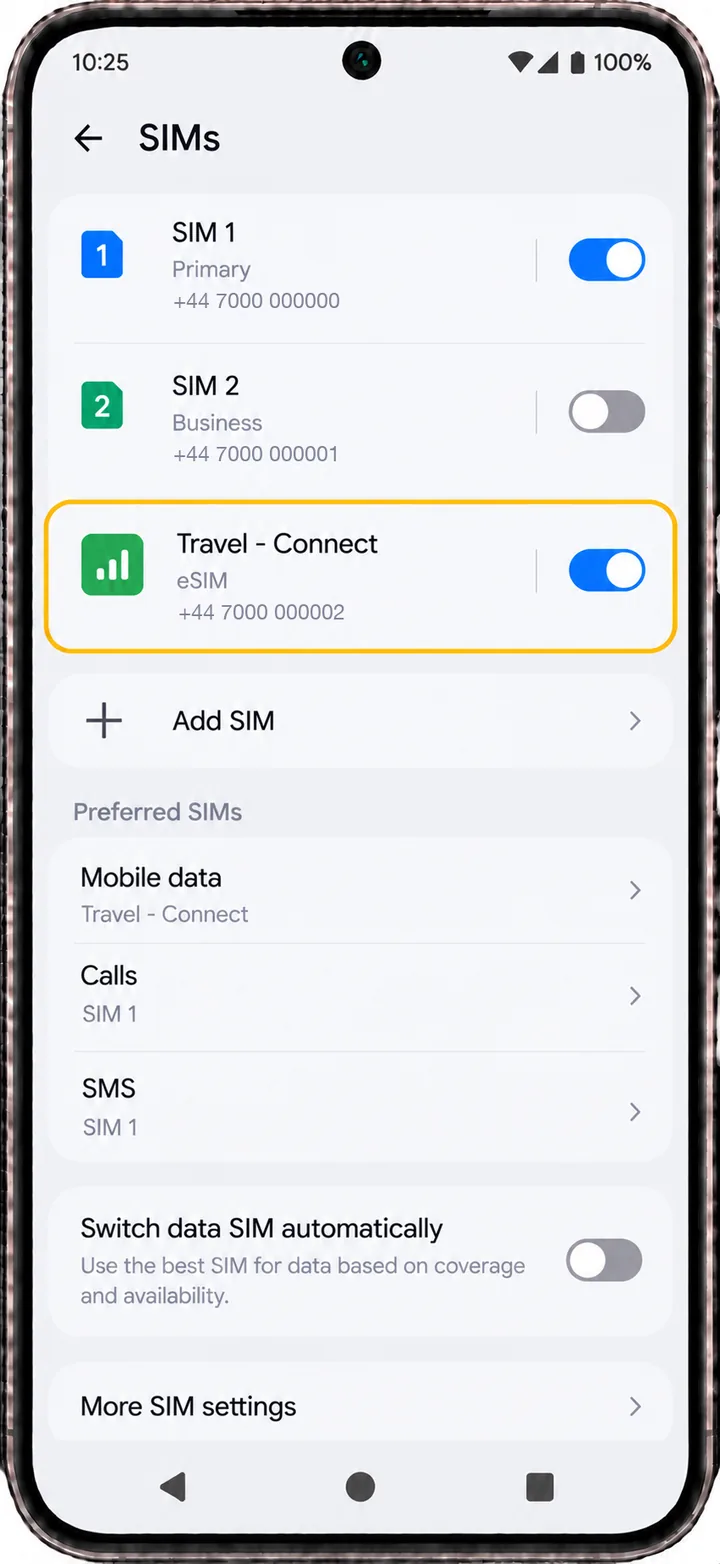
Mobile data decides which line carries your internet. Step 10 of 12
Select the travel line and turn on Data roaming
Select Travel - Connect, then check two switches on this screen: Mobile data and Data roaming. Both need to be on. Data roaming is what lets your BrisqNet eSIM use our partner networks abroad - without it you will have no data. Turn it on for the BrisqNet travel line. To help avoid roaming data charges from your usual mobile provider, keep Data roaming off for your usual SIM. Your BrisqNet eSIM is designed to stay installed and be reused for future trips, so leave it in place. If something is not working, contact support rather than removing it.
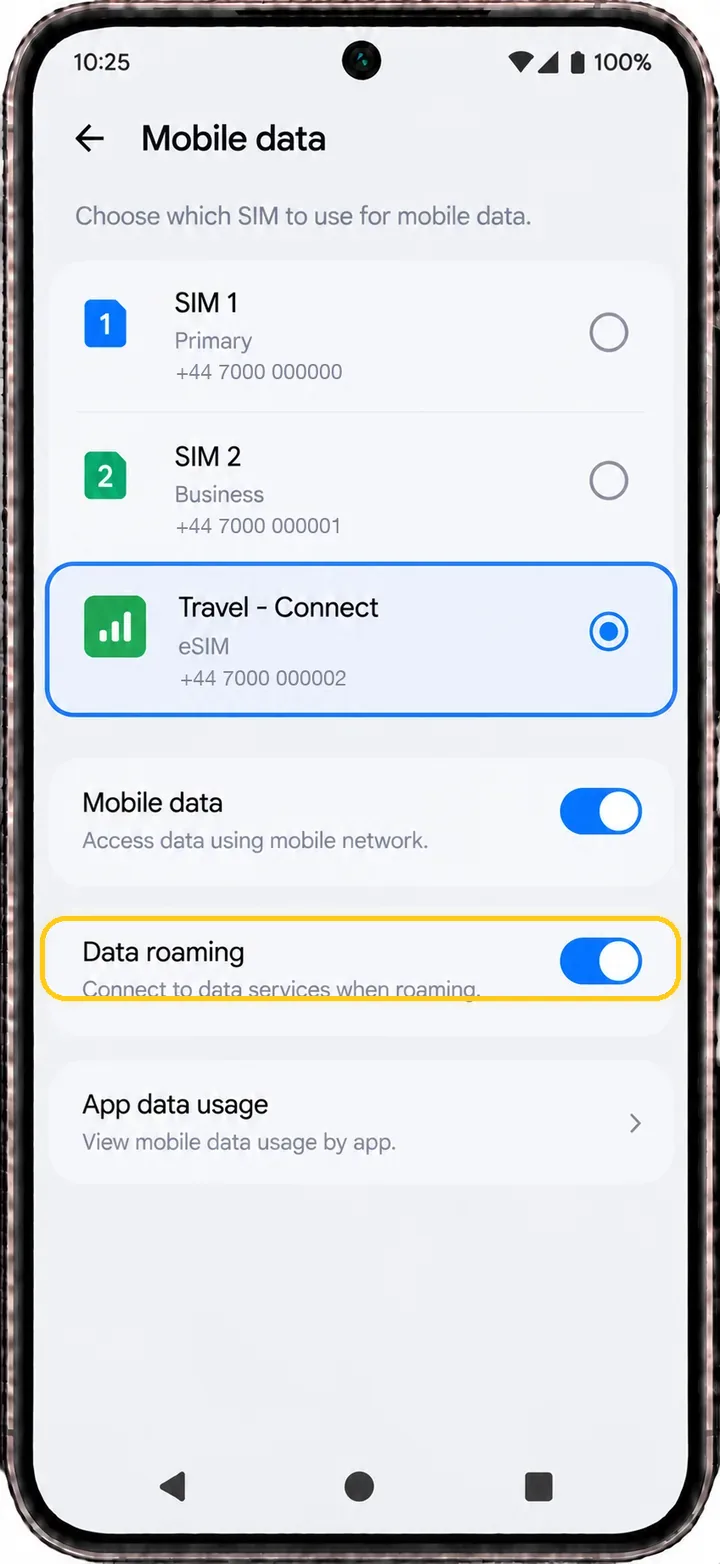
Travel line selected, Mobile data on, Data roaming on.
Installation link expired?
This is a separate path, not the next step after installing. Secure installation links are time-limited and last 7 days. If yours has expired, nothing is lost. Your eSIM is still in your account.
Step 11 of 12
If your installation link has expired
Installation links are time-limited for your security and last 7 days. Opening an old one shows "Your secure installation link has expired". Nothing has been lost - your eSIM is still yours and still in your account. Tap Get a new installation link.
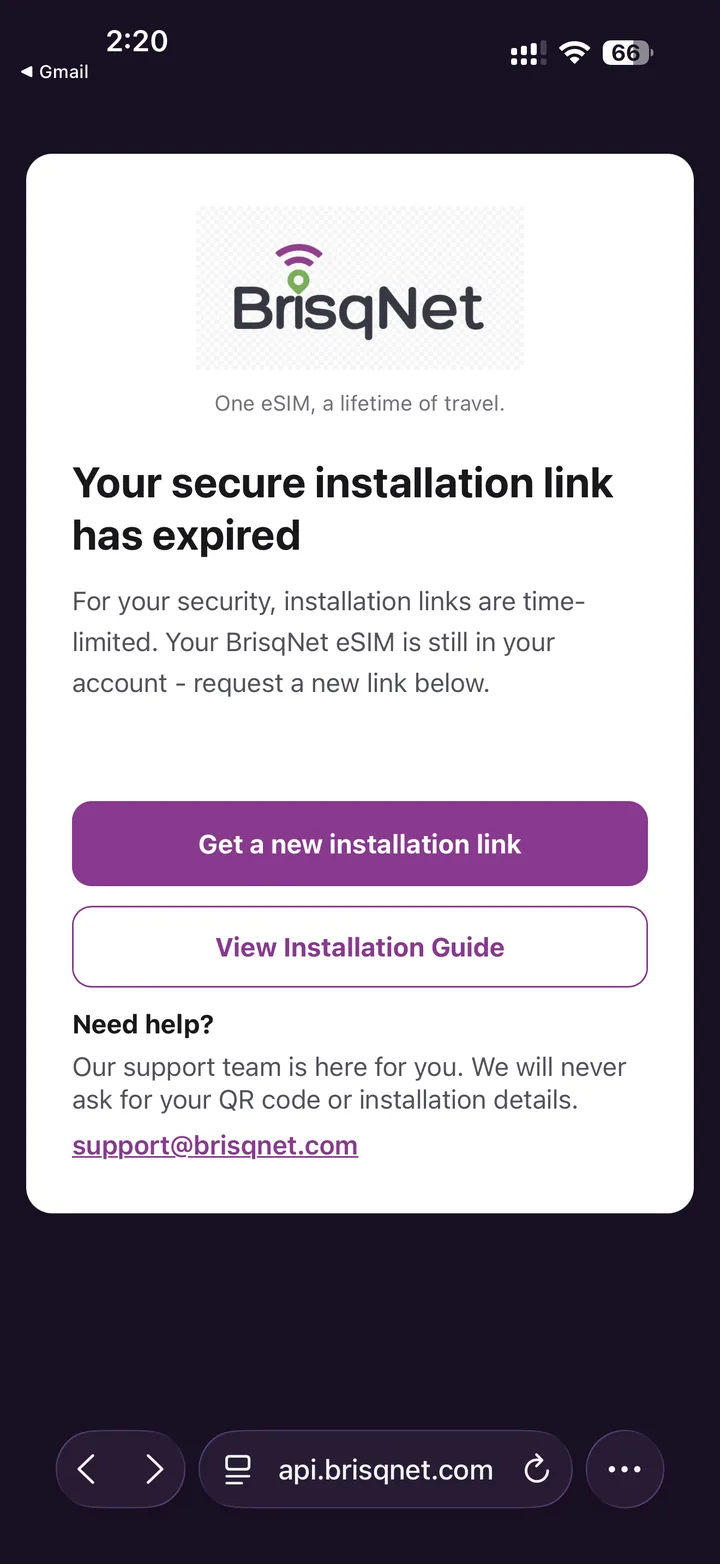
An expired link is normal, and nothing about your plan is affected. Step 12 of 12
Check your email for the new link
BrisqNet sends a fresh link to the email address on your account and the button confirms Link sent. Open the new email and start again from step 1. If it has not arrived after a few minutes, check your spam folder and then contact support - do not delete an eSIM that is already installed to try to fix this.
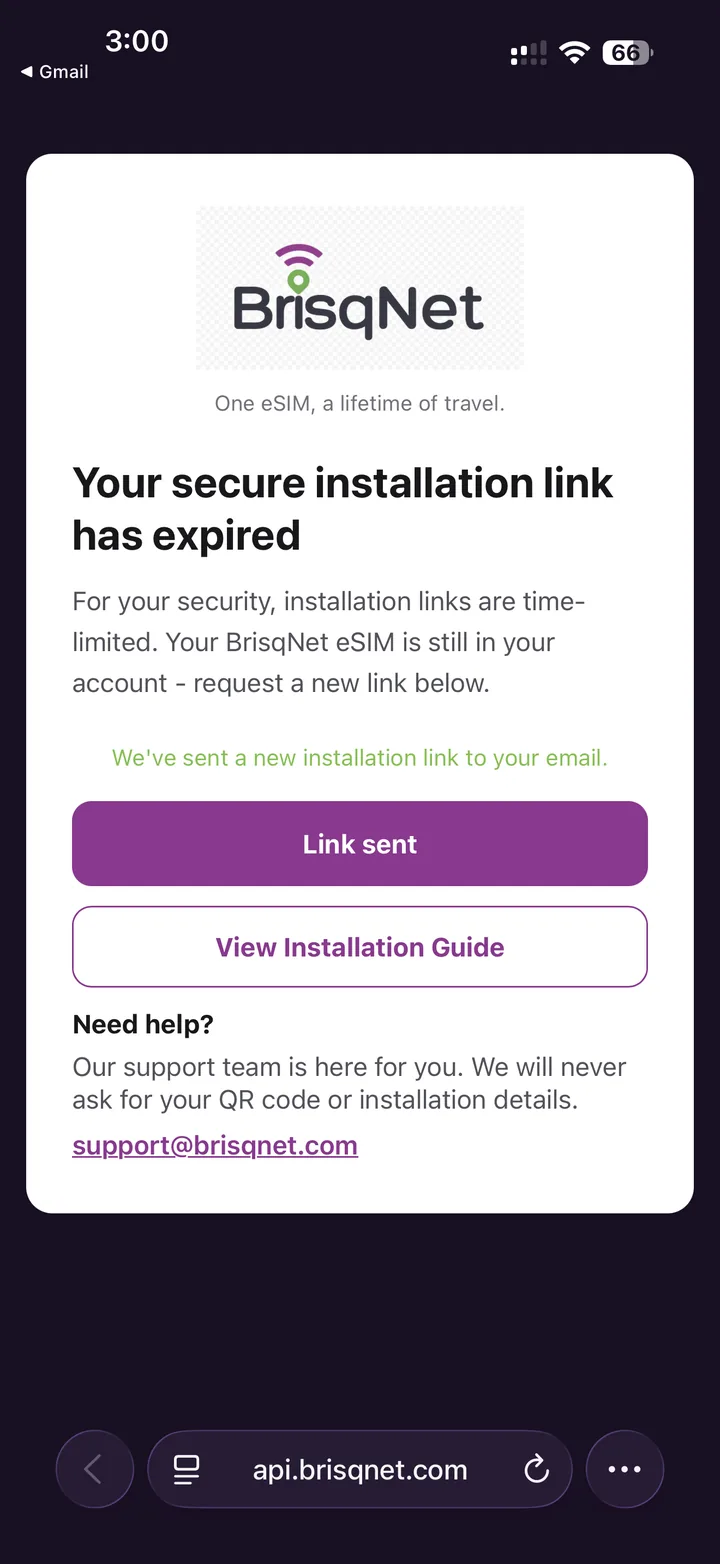
Open the new email and start again from step 1.
The screenshots on this page are sanitised copies: names, phone numbers and QR codes have been permanently removed from the image files themselves. BrisqNet never publishes real customer activation details, and support will never ask you for your QR code.
Your BrisqNet eSIM stays on your phone so you can add data for future trips. If something is not working, contact support rather than removing it.
Need compatibility help? Check supported devices.
Still need help?
Email our support team and include your order reference and device model.
support@brisqnet.com